Content
- 1 Practical ingredients and basic tools to create safe homemade playdough
- 2 Step-by-step method for making soft, non-toxic homemade playdough
- 3 Customizing homemade playdough: colors, scents, and creative ideas
- 4 Storage and maintenance tips to extend the lifespan of homemade playdough
- 5 Educational and developmental benefits of engaging with homemade playdough
- 5.1 What is the main purpose of homemade playdough?
- 5.2 Which ingredients are essential for making non-toxic playdough?
- 5.3 How should homemade playdough be stored to maintain its quality?
- 5.4 Can homemade playdough be customized with colors and scents?
- 5.5 What tools are necessary for making homemade playdough?
The appeal of homemade playdough extends beyond simple amusement, providing a blend of safety, creativity, and cost-efficiency ideal for households focusing on sustainable and prudent living. In 2025, families and educators alike emphasize the importance of engaging children in activities that foster sensory development and imaginative thinking without exposing them to harmful chemicals. This drive has propelled the recipe of soft, non-toxic playdough to the forefront as an accessible, easy-to-make resource. Crafted with common household ingredients, this DIY playdough guarantees peace of mind to parents prioritizing safety and environmental considerations while stimulating children’s creativity and fine motor skills.
While commercial playdough is widely available, it often comes with a higher price tag and contains additives that may not align with a smart, frugal lifestyle. By opting for Homemade Playdough, one secures a reliable and long-lasting solution that can be customized to suit personal preferences, including color, scent, and texture enhancements without added expense or environmental impact. This article explores the sensible approach to making safe playdough, practical steps for preparation, and ways to enrich the play experience with minimal investment.
Practical ingredients and basic tools to create safe homemade playdough
Understanding the composition of non-toxic playdough is the first step in crafting a sensory material that is both safe and economically sound. Commonly available ingredients—flour, salt, cream of tartar, vegetable oil, and water—comprise the base, offering a mixture that is stable, pliable, and non-toxic. These simple components ensure that the playdough does not contain synthetics or allergens typically found in commercial variants, addressing parental concerns about chemical exposure.
- Flour (2 cups) provides the primary structure, enabling a soft and moldable texture.
- Salt (1/2 to 1 cup) not only plays a role in preservation but also enhances the dough’s firmness.
- Cream of tartar (2 tablespoons) acts as a stabilizer to improve elasticity and shelf life.
- Vegetable oil (2 tablespoons) adds moisture and smoothness to ensure flexibility.
- Water (2 cups) hydrates the dry ingredients, enabling the mixture to coalesce properly.
- Optional add-ins: Food coloring, essential oils, or natural colorants such as beet juice or turmeric offer opportunities for customization.
Beyond ingredients, having the right tools greatly facilitates an efficient preparation process. A large mixing bowl permits careful combination of dry and wet components, while precise measurement implements ensure consistency in texture and safety. Cooking the mixture over medium heat within a saucepan turns the batter into the desired soft dough, which is then kneaded for elasticity.
| Tool | Purpose |
|---|---|
| Mixing bowl | Combine dry and wet ingredients efficiently |
| Measuring cups and spoons | Ensure accurate ingredient proportions |
| Saucepan | Cook mixture until thickened and pliable |
| Whisk or spoon | Stir ingredients to prevent lumps |
| Silicone mat (optional) | Ideal surface for kneading without mess |
One notable advantage of creation at home lies in the ability to skip harmful preservatives and dyes, ensuring that the playdough remains safe playdough suitable for children’s use. This transparency fosters a sense of autonomy in managing household crafts while sharply reducing the cost of materials.
Step-by-step method for making soft, non-toxic homemade playdough
Crafting durable and soft playdough requires adherence to a few essential steps that transform simple ingredients into a versatile sensory material. The method balances efficiency and safety, offering a DIY playdough experience that can be completed within 15 to 20 minutes.
- Mix dry ingredients: Combine flour, salt, and cream of tartar in a mixing bowl, stirring for even distribution.
- Add wet ingredients: Pour in water and vegetable oil; if coloring is desired, include food coloring drops now to integrate evenly.
- Cook over medium heat: Pour mixture into a saucepan, stirring continuously. The mixture will thicken and begin to form a ball as the starch gelatinizes.
- Remove and cool: When the dough pulls away from the pan sides, remove from heat and let it cool slightly so it can be safely handled.
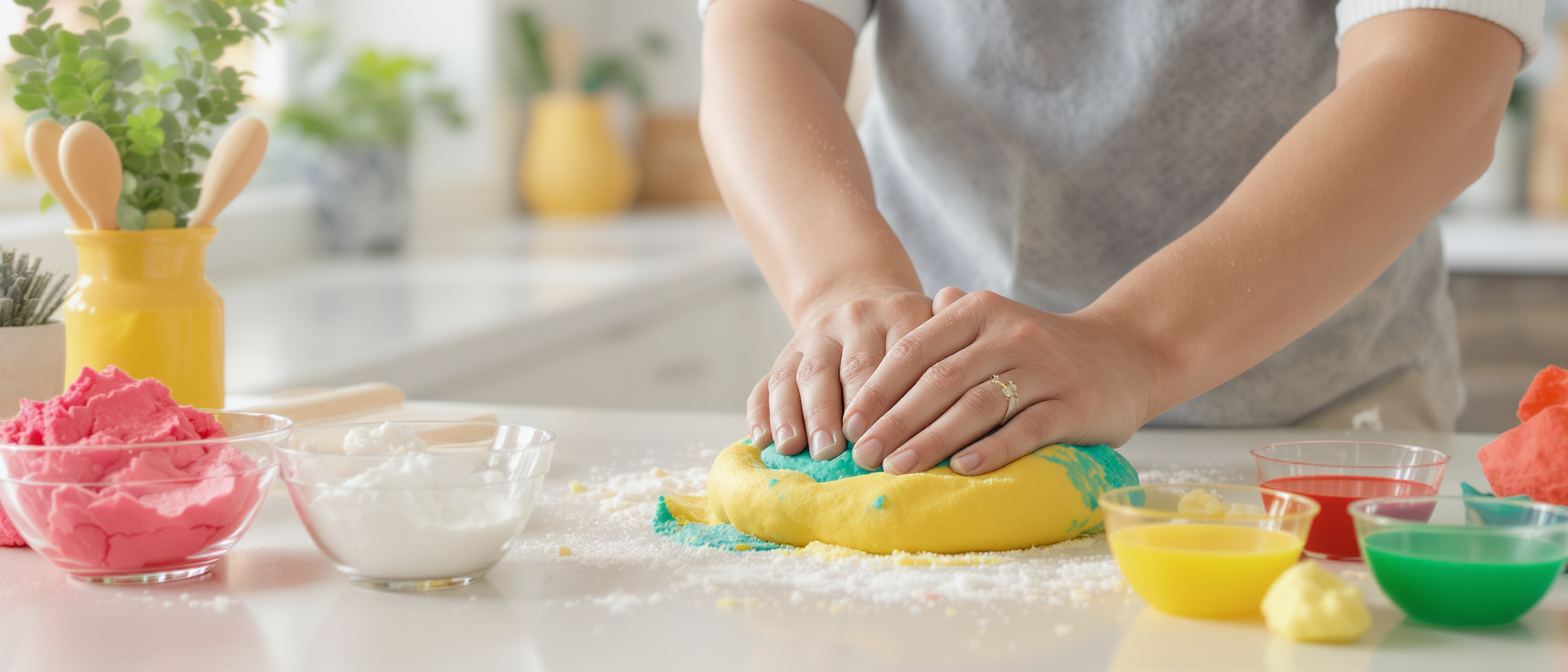
- Knead thoroughly: On a clean surface, knead the dough for around two minutes. This step enhances smoothness and elasticity.
- Add optional scents: At this stage, infuse essential oils or natural scents to introduce olfactory cues, enriching the sensory play experience.
- Store in airtight containers: Proper storage keeps the dough fresh and pliable, extending its usability over several weeks.
This precise preparation ensures the resulting soft playdough retains ideal pliability and softness, avoiding the dryness or crumbliness that can frustrate users and shorten play sessions. From a pragmatic standpoint, mastering this routine secures a continuous supply of engaging, cheap playdough that supports play and learning in an economical manner.
| Step | Description | Effect |
|---|---|---|
| Mix dry ingredients | Ensure even distribution of flour, salt, and cream of tartar | Creates uniform texture, prevents lumps |
| Add wet ingredients | Introduce moisture and optional colors | Promotes cohesive dough formation and aesthetic customization |
| Cook | Heat the mixture over medium heat, stir continuously | Triggers gelatinization, thickens the dough into a ball |
| Cool | Remove from heat and allow to cool for safe handling | Prevents burns and firms dough for kneading |
| Knead | Work the dough on a flat surface | Improves softness, elasticity, and consistency |
| Store | Place in airtight container | Maintains moisture and prolongs shelf life |
Customizing homemade playdough: colors, scents, and creative ideas
The versatility of DIY playdough lies in its readiness for personalized adaptation. Simple natural ingredients can significantly transform the look and feel of the dough, allowing for a multisensory experience that promotes deeper engagement and learning.
Natural coloring agents
Substituting commercial food colorings with natural alternatives leverages kitchen staples to paint the playdough with safe, vibrant hues:
- Beet juice: yields a rich, deep pinkish-red shade, perfect for lively projects.
- Turmeric powder: imparts a warm yellow tone while offering anti-inflammatory properties during play.
- Spinach puree: delivers a muted green while introducing an element of nature’s involvement.
- Blueberry juice: adds a subtle blue tint, giving a soft yet appealing color.
Enhancing scents for multisensory stimulation
Integrating scents into the playdough extends its appeal beyond the tactile function, engaging children’s olfactory senses:
- Lavender essential oil: promotes relaxation and calmness during playtime.
- Peppermint essential oil: invigorates and refreshes, adding alertness to creative sessions.
- Cinnamon powder: warmly spicy, fostering a cozy atmosphere.
- Vanilla extract: infuses sweetness that children often find comforting.
These customizations must be approached judiciously, balancing the intensity of color and scent to maintain safety and maximize sensory appeal. Using natural materials also complements an eco-conscious lifestyle, aligning with frugal and responsible parenting principles.
| Customization | Materials | Benefits |
|---|---|---|
| Natural coloring | Beet juice, turmeric, spinach puree, blueberry juice | Safe, eco-friendly, vibrant and varied colors |
| Scented playdough | Lavender oil, peppermint oil, cinnamon powder, vanilla extract | Engages olfactory senses, enriches play experience, calming or invigorating effects |
| Adding texture | Glitter, small beads | Increases sensory variety, tactile stimulation |
With these simple yet effective enhancements, homemade playdough transcends mere craft: it becomes a bespoke tool for development, appealing to diverse sensory pathways and fostering enthusiasm for creative play in a sustainable way.
Storage and maintenance tips to extend the lifespan of homemade playdough
Maintaining the integrity and prolonging the life of cheap playdough created at home requires prudent storage and occasional care. Proper handling maximizes the return on investment of ingredients and effort, aligning perfectly with a mindset oriented towards practicality and sustainability.
- Use airtight containers: Sealing playdough tightly prevents exposure to air, which can dry out and harden the dough.
- Store in a cool, dry place: Avoiding heat and sunlight helps preserve moisture and slows spoilage.
- Check for contamination: Inspect playdough regularly for mold or unusual odors, discarding any compromised batches to ensure safety.
- Revive dried playdough: Adding a few drops of water and kneading can restore softness in slightly hardened playdough.
- Separate colors: Store different colored playdough in separate containers to prevent blending and maintain vibrancy.
Adherence to these guidelines can extend the usability of each batch from a few days to several weeks, making homemade playdough an economical choice for families seeking longevity and quality in their crafts. Moreover, the simple care routine required reinforces a resourceful approach to household materials, further enhancing self-reliance and reducing waste.
| Tip | Purpose | Additional Notes |
|---|---|---|
| Airtight container | Prevent drying and hardening | Use plastic or glass containers with tight lids |
| Cool, dry place | Preserve moisture and consistency | Avoid direct sunlight and heat sources |
| Regular inspection | Ensure safety by preventing mold growth | Discard any spoiled batches immediately |
| Softening hardened dough | Restore pliability | Add water sparingly when kneading |
| Color separation | Maintain color integrity | Prevents unintentional color mixing |
Educational and developmental benefits of engaging with homemade playdough
Besides serving as an inexpensive and fun activity, homemade playdough is a gateway to meaningful development in children’s sensory and motor skills. This tangible medium fosters creativity, focus, and hand-eye coordination, playing a pivotal role in early childhood learning modalities emphasized by educators worldwide in 2025.
- Promotes fine motor skills: Manipulating dough strengthens hand muscles and dexterity essential for writing and other tasks.
- Encourages sensory play: Engaging touch, smell, and sometimes sight, children learn to process sensory input effectively.
- Stimulates creativity and imagination: Molding shapes and patterns nurtures an open-ended play environment where innovation thrives.
- Enhances concentration: Focused play with malleable materials improves attention span and patience.
- Supports emotional expression: Children find outlets for feelings through shaping and tactile experiences, contributing to emotional intelligence.
Integrating safe, homemade playdough into educational routines aligns with a comprehensive approach to child development. It embodies a pragmatic investment yielding cognitive and emotional benefits while resonating with values of sustainability and independence favored by families committed to resilience.
| Developmental Benefit | Description | Example Activity |
|---|---|---|
| Fine motor skill enhancement | Improves hand strength and coordination | Rolling and shaping small playdough balls |
| Sensorial engagement | Stimulates touch, smell, and sight | Adding scented oils and colorful food dyes |
| Creative stimulation | Encourages open-ended, imaginative play | Crafting animals, letters, or abstract shapes |
| Concentration improvement | Builds focus and patience | Following detailed shaping instructions |
| Emotional expression | Provides a healthy outlet for feelings | Molding shapes to represent moods or stories |
What is the main purpose of homemade playdough?
Homemade playdough serves as a safe, inexpensive activity that promotes creativity and fine motor skill development without the risks of commercial chemical additives.
Which ingredients are essential for making non-toxic playdough?
Key ingredients include all-purpose flour, salt, cream of tartar, vegetable oil, and water. Optional additions allow for coloring and scent but do not affect safety.
How should homemade playdough be stored to maintain its quality?
Store playdough in airtight containers at room temperature away from heat and sunlight. Regularly inspect for signs of spoilage and discard as needed.
Can homemade playdough be customized with colors and scents?
Yes, natural dyes like beet juice and turmeric, as well as essential oils such as lavender or peppermint, can safely enhance the sensory experience.
What tools are necessary for making homemade playdough?
Essential tools are a mixing bowl, measuring cups and spoons, a whisk or spoon, and a saucepan for cooking. Optional items include silicone mats and cookie cutters for shaping.