Content
- 1 Understanding the acid staining process and why it matters in DIY flooring
- 2 Choosing the best acid stain and preparing concrete floors for optimal results
- 3 Step-by-step application techniques for effective acid stain concrete floors
- 4 Essential safety measures when working with acid stain concrete floors
- 5 Finishing and maintaining acid-stained concrete floors for enduring beauty
- 5.1 Can acid stain be applied to existing concrete floors?
- 5.2 How long does acid-stained concrete floor last?
- 5.3 Is acid staining concrete a safe DIY project?
- 5.4 What is the difference between acid stain and water-based stain for concrete?
- 5.5 How often should the sealed concrete floor be maintained?
How to stain concrete floors with acid stain offers a practical solution for transforming dull, boring surfaces into vibrant, durable finishes that stand the test of time. Many homeowners and professionals alike seek to maximize the aesthetic potential of concrete through staining — a method that combines chemistry and artistry to achieve unique floor designs. With the rise of DIY flooring projects, mastering the acid staining process becomes a valuable skill for those intent on enhancing their living spaces while maintaining cost-efficiency. As concrete remains a staple substrate due to its resilience and affordability, knowing how to properly prepare, apply, and preserve stains means unlocking endless possibilities in concrete floor finish.
When examining concrete stain technology in 2025, the emphasis remains on sustainable, smart methodologies that extend the lifespan of floors without excess waste or replacement. Acid stains chemically interact with the concrete’s minerals, creating a marbled, earthy effect with excellent durability—advantages that help balance aesthetics and functionality. This guide breaks down critical flooring tips for anyone keen on applying acid stains effectively, detailing each stage from initial cleaning through to sealing and ongoing concrete floor maintenance. Embracing these systematic steps not only enhances beauty but also fortifies the floor for years of reliable use, reflecting an intelligent, resource-conscious approach to home improvement.
In brief:
- Proper surface preparation is essential to ensure stain adhesion and consistent coloring.
- Selecting the appropriate acid stain with consideration for chemical composition impacts both reaction and longevity.
- Testing concrete pH levels prior to application helps guarantee optimal stain absorption.
- Applying acid stain in controlled layers yields rich, multidimensional finishes.
- Strict adherence to safety protocols protects occupants and installers.
- Sealing the concrete surface prevents premature degradation and maintains vibrant hues.
- Routine maintenance and resealing are required for lasting performance.
- Both new and existing concrete surfaces can be acid stained if prepared properly.
Understanding the acid staining process and why it matters in DIY flooring
The core of successful stained concrete floors lies in comprehending the chemical interaction that acid stains create with the concrete substrate. Acid stains are composed of a mixture of hydrochloric acid and metallic salts, which react with the concrete’s calcium hydroxide. This reaction creates complex, variegated patterns with natural earth tones ranging from rich browns to greens and blues. This process is fundamentally different from simple surface painting as the stain penetrates and becomes a permanent part of the concrete matrix.
For the DIY enthusiast, recognizing these scientific underpinnings informs critical choices like stain selection and surface preparation. If the concrete pH or moisture content is off balance, the acid staining will not react evenly, producing blotchy or patchy areas. Using high-pressure washers followed by degreasers ensures the concrete surface is free of contaminants, essential because even thin layers of dirt can hamper chemical bonding. Testing pH with easily available kits before applying the stain confirms the surface’s readiness.
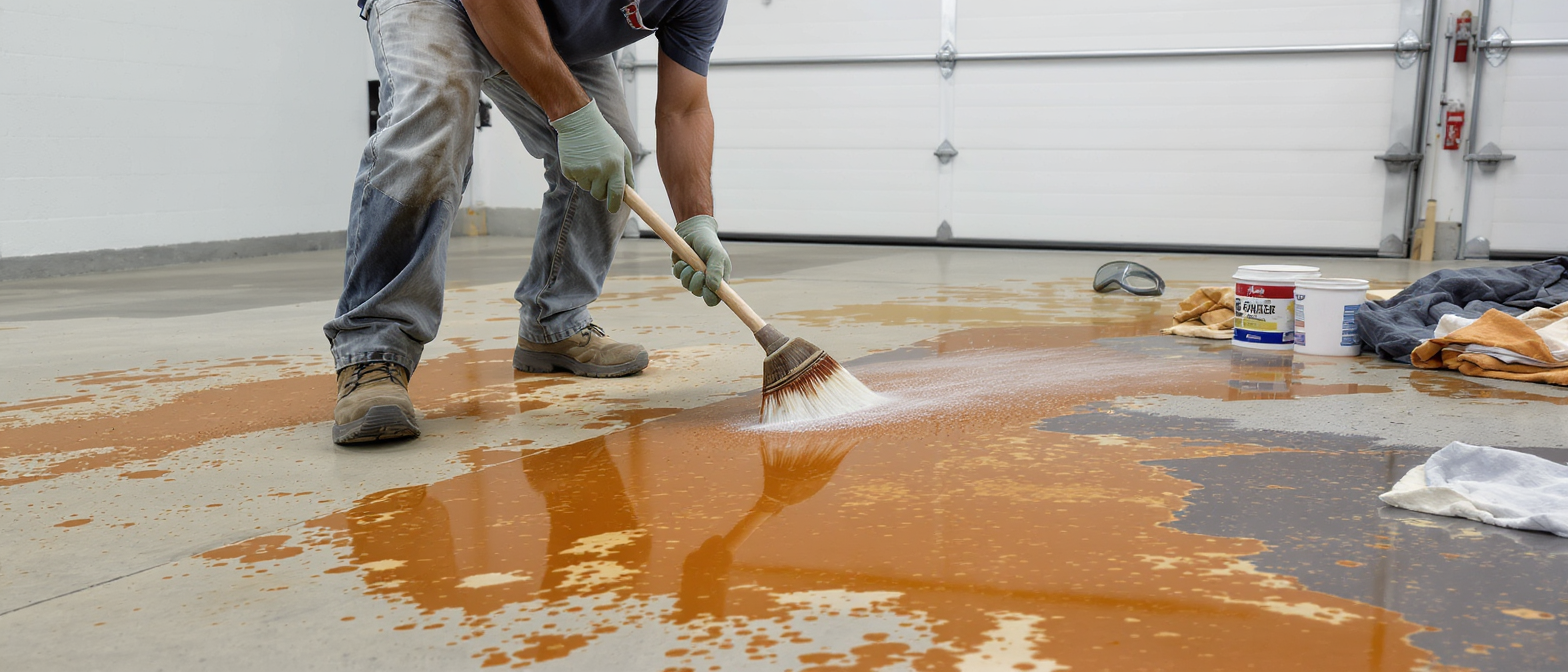
Application techniques also rely on understanding the reaction’s timing and layering. Once the acid stain is applied, it begins to react immediately with the concrete, typically taking anywhere from 15 minutes to a few hours to develop. Waiting longer than recommended can result in overly dark spots, while premature rinsing might leave the color faint. Employing spray methods allows even coverage over large areas, while brushes help treat corners or detailed regions, showcasing a balance of precision and efficiency in stain application.
Applying several stain layers deepens color intensity but requires careful drying time between coats. The result is a customized concrete floor finish that can simulate luxurious stone, marble, or other natural materials without costly installation. This precise crafting turns a practical surface into a statement of durable sophistication in home environments.
| Step | Key Considerations | Tools/Materials Required |
|---|---|---|
| Surface Cleaning | Remove dirt, grease, existing sealers | High-pressure washer, degreaser, scrub brush |
| pH Testing | Confirm concrete is within acceptable pH range | Concrete pH testing kit |
| Stain Application | Apply evenly with proper technique, observe drying time | Sprayer, brushes, rollers |
| Neutralizing | Stop acid reaction to set color | Neutralizer solution (ammonia or baking soda-based) |
| Sealing | Protect against wear, UV, and moisture | Polyurethane or acrylic sealant |
Choosing the best acid stain and preparing concrete floors for optimal results
Before commencing any stain concrete floors project, the choice and preparation of materials set the foundation for a successful outcome. In 2025, advancements in acid stain formulations provide better resistance to fading and enhanced color retention. Opting for brands that blend hydrochloric acid with diverse metallic salts allows for a broader spectrum of natural tones. Some manufacturers also add proprietary additives to improve ease of application and environmental safety.
The preparation process involves more than simple cleaning; it’s about optimizing the surface conditions. Concrete floors must be inspected for cracks, chips, or surface damage. Repairing imperfections with patching compounds ensures an even canvas for stain application. Moreover, any existing coatings or sealers must be entirely removed using chemical strippers or abrasive techniques, as residues hinder the acid’s ability to penetrate and react with the base concrete.
Effective preparation includes:
- Using a degreaser to eliminate oil or grease spots typically found in garages or industrial spaces, which can repel stains.
- Conducting a moisture test, since overly damp concrete inhibits stain absorption and can cause discoloration.
- Smoothing surfaces via light grinding for old concrete, improving stain adherence without compromising durability.
The benefits of rigorous preparation are twofold: improved stain uniformity and enhanced durability of the concrete floor finish. Additionally, understanding that acid stains work best on concrete at least 28 days old respects the chemical curing process of concrete, which affects stain reactivity.
| Material/Process | Purpose | Tools/Products |
|---|---|---|
| Concrete surface cleaning | Remove contaminants for proper stain adhesion | Pressure washer, degreaser solution |
| Crack repairs | Ensure smooth surface, prevent stain inconsistencies | Concrete patch compound, trowel |
| Existing coating removal | Eliminate barriers to stain penetration | Chemical stripper, floor grinder |
| pH and moisture testing | Understand surface conditions for stain effectiveness | Test kits (pH, moisture meter) |
In summary, the precise selection of acid stains and dedicated preparation practices form the keystone for robust, visually appealing concrete floors that meet both aesthetic and operational expectations. This methodical groundwork eliminates common problems encountered in the acid staining process, such as uneven coloration or peeling.
Step-by-step application techniques for effective acid stain concrete floors
Proper stain application techniques are vital to harness the full potential of acid stain concrete floors. The approach emphasizes a balance between art and science, requiring patience, accuracy, and attention to environmental factors such as temperature and humidity, which influence drying and reaction times.
Key steps in the application include:
- Test patch application: Performing a small test area helps predict the final look and reveals how the concrete reacts to the stain. It informs needed adjustments in stain concentration or application strategy.
- Layered stain application: Applying the stain in several thin coats rather than a single heavy one produces richer, more consistent colors. This layering also lessens the risk of runoff or pooling that can mar the finish.
- Even distribution techniques: Utilizing a pump sprayer offers consistent coverage over larger surfaces, while brushes and rollers are better for edges and detailed sections. Maintaining a wet edge prevents overlap marks or streakiness.
- Neutralization and rinsing: After the stain develops fully, applying a neutralizing solution such as ammonia or baking soda stops the chemical reaction, fixing the color in place. Rinsing removes residue that could degrade or dull the surface if left.
- Drying and curing: Allow the concrete to dry fully before any sealant application, which could take 24 to 48 hours depending on conditions.
Flooring tips stress the necessity of working in manageable sections, especially in large rooms, to prevent the stain from drying unevenly. Temperature control is important; ideally, the area should be between 50–85°F (10–29°C) to optimize reaction and drying without unwanted condensation.
| Task | Recommended Procedure | Tools/Products Needed |
|---|---|---|
| Small test patch | Apply and observe color over 24 hours | Acid stain, brush or sprayer |
| Layer application | Multiple thin coats for depth | Pump sprayer, brush, roller |
| Neutralizer use | Apply post-reaction to fix color | Baking soda or ammonia solution |
| Cleanup | Rinse thoroughly to remove residues | Water hose, mop |
Employing these techniques ensures a consistent and eye-catching application, making the concrete floor a durable, attractive feature in any space. Meticulous attention to each stage stands central to mastering this intricate yet rewarding aspect of home improvement.
Essential safety measures when working with acid stain concrete floors
Prioritizing health and safety during the acid staining process cannot be overstated. Given the corrosive nature of acid stains and the vapors they emit, diligent adherence to protective measures safeguards installers and occupants alike. This adherence is a practical necessity in any DIY flooring project.
Personal protective equipment (PPE) includes acid-resistant gloves such as nitrile or neoprene, long-sleeved shirts, pants, and chemical splash goggles or face shields. Respiratory protection — like masks with acid gas filters — becomes essential in poorly ventilated spaces to mitigate inhalation risks.
Ventilation is critical to disperse fumes. For indoor projects, ensure windows and doors are open or employ exhaust fans. In industrial or commercial spaces with less natural airflow, temporary ventilation systems may be warranted. Avoiding enclosed environments during application is a fundamental precaution.
Additional safety protocols include:
- Storing acid stains securely in clearly labeled containers away from children and pets.
- Using neutralizing agents promptly if spills occur to reduce hazardous exposure.
- Keeping a water source or emergency eyewash station close by to respond to accidental contact.
- Clearing the work zone of flammable materials and ensuring no ignition sources are within proximity while using acid-based products.
These precautions reflect a responsible, well-prepared approach to handling chemicals involved in concrete floor finish projects. Ensuring safety does not merely protect individuals but also supports quality results by avoiding accidents that could compromise the flooring’s appearance or integrity.
| Safety Aspect | Recommended Equipment/Measure | Purpose |
|---|---|---|
| Gloves and clothing | Nitrile gloves, protective clothing | Prevent skin contact with acids |
| Eye protection | Goggles, face shields | Protect eyes from splashes |
| Respiratory protection | Acid gas masks or respirators | Avoid inhaling harmful fumes |
| Ventilation | Fans, open windows | Remove toxic vapors |
Finishing and maintaining acid-stained concrete floors for enduring beauty
Once the stain has fully developed and the surface is neutralized and rinsed, sealing the concrete floor completes the transformation. Sealing acts as a shield, protecting against moisture, stains, and heavy foot traffic, which can otherwise accelerate wear or color fading. Selecting a sealer suitable for the specific acid stain and environment is crucial to ensure compatibility and optimal concrete floor maintenance.
Two common types of sealers are popular for acid-stained floors:
- Water-based sealers: Easier to apply and clean, they offer a clear finish that preserves the stain color with moderate durability.
- Oil-based sealers: Longer-lasting and often enhance the color depth, though requiring more effort in application and odor control.
Routine cleaning with soft brushes and pH-neutral detergents preserves the sealed surface without degrading protection. Avoiding harsh chemicals or abrasive scrubbing maintains the finish integrity. Over time, reapplication of sealer every 2-5 years, depending on wear and exposure, renews protective qualities and ensures the floor remains vibrant.
| Maintenance Task | Frequency | Recommended Products/Techniques |
|---|---|---|
| Daily/weekly cleaning | Regularly | Sweeping, mop with pH-neutral cleaner |
| Sealer reapplication | Every 2-5 years | Appropriate water/oil-based sealer |
| Scratch and wear touch-ups | As needed | Spot sealant application |
By integrating ongoing maintenance into the lifecycle of acid-stained concrete floors, a harmonious balance of aesthetics and structural integrity is achieved—underlining the intelligence of investing effort and resources into this sustainable home improvement approach.
Can acid stain be applied to existing concrete floors?
Yes. Acid stains can be applied to both new and existing concrete floors, provided the surface is thoroughly cleaned and any previous sealers or coatings are removed to ensure proper stain penetration.
How long does acid-stained concrete floor last?
With appropriate sealing and regular maintenance, acid-stained concrete floors can maintain their vibrant appearance and durability for over 10 years, even in high-traffic environments.
Is acid staining concrete a safe DIY project?
Yes, when following recommended safety protocols including wearing PPE, ensuring proper ventilation, and handling chemicals carefully, acid staining is suitable for DIY enthusiasts.
What is the difference between acid stain and water-based stain for concrete?
Acid stains chemically react with concrete producing natural, variegated colors, while water-based stains sit on the surface offering brighter, consistent coloration and more pattern control.
How often should the sealed concrete floor be maintained?
Regular cleaning should be done weekly, and resealing is generally recommended every 2-5 years depending on wear and exposure to maintain protection and appearance.